
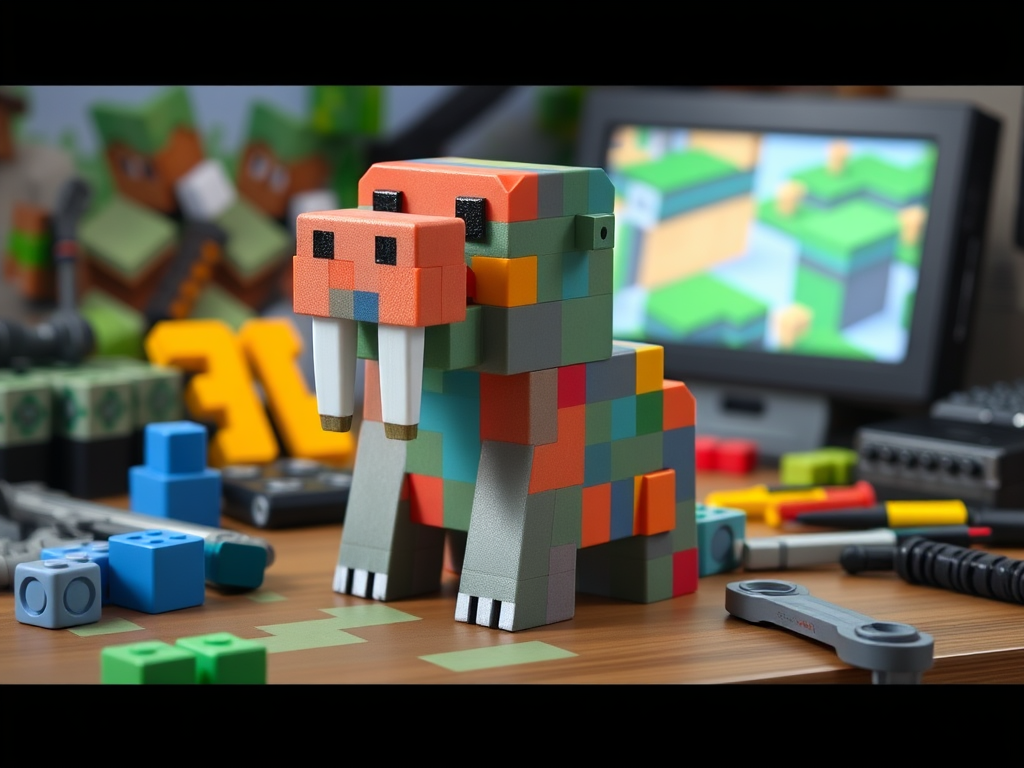
Minecraft mods have created an entire universe of new items, creatures, and characters beyond the base game. One fan-favourite addition is the Walrus from Extra Cells 2, a storage expansion mod for Applied Energistics 2. Now, with 3D printing, you can bring the adorable Extra Cells 2 Walrus into the real world with your custom 3D print! This guide will show you everything you need to know, from where to find the best models, tips on printing, finishing techniques, and ways to customise your Minecraft-themed walrus.
Why 3D Print the Extra Cells 2 Walrus?
The Extra Cells 2 Walrus isn’t just a cute mascot. It represents a deeper connection to Minecraft’s creative and modding community. Printing your walrus has a lot of appeal:
Top Reasons to 3D Print the Walrus:
- Display Pride: Show off your love for one of Minecraft’s best mods.
- Cute Decor: Perfect for your gaming room or desk setup.
- Great Gift Idea: Surprise Minecraft friends or fans with a handmade figure.
- Creative Hobby: Enjoy designing, painting, and customising your version.
A 3d-printed Walrus bridges the digital and real-world magic of Minecraft.
Where to Find Extra Cells 2 Walrus Models
Finding the perfect walrus model is the first step. Here are your options:
- Fan-made 3D Files: Search for Minecraft-themed models on sites like Thingiverse, MyMiniFactory, or Cults3d.
- Design Your Own: If you want a truly custom walrus, it’s simple enough to model one based on Minecraft’s blocky style.
- Commission an Artist: Some 3D modellers specialise in gaming fan art and can create a detailed walrus file for you.
Minecraft characters are naturally blocky, making them easy to model and print, even for beginners.
Best Materials for Printing a Walrus Model
Depending on how you want your walrus to look and feel, here are the best filaments to use:
- PLA: Great for easy printing, smooth surfaces, and painting.
- PETG: Adds a little flexibility and extra strength, making it suitable for larger prints.
- Resin: Perfect if you want a high-detail, smooth miniature version.
For most people printing small to medium-sized figures, PLA is the easiest and most affordable choice.
Recommended Print Settings
Even simple models print better with fine-tuned settings. Use these suggestions:
- Layer Height: 0.2 mm for standard quality; 0.1 mm for finer details.
- Infill: 15%–25 % is enough for solid, strong figurines.
- Supports: Minimal support is needed if the model follows Minecraft’s blocky style.
- Walls: 2–3 perimeter walls for better strength.
- Bed Temperature: 50–60°C (for PLA).
- Nozzle Temperature: 190–210°C (for PLA).
Minecraft designs are very forgiving for 3D printers, making this project great even for beginners.
Creative Ways to Customise Your Walrus
Want to make your walrus truly unique? Try these ideas:
- Custom Colours: Paint your walrus in classic brown or create fantasy versions like icy blue or lava-themed.
- Add Accessories: 3D print tiny hats, glasses, or tools for your walrus.
- Nameplates: Add a small printed stand with the name of your walrus.
- Texture Painting: Give fur texture or shading for a more artistic look.
With just a little extra effort, your walrus becomes an actual work of art.
Finishing and Painting Your Walrus
Once printed, a few simple finishing steps will make your walrus shine:
- Sanding: Lightly sand rough edges for a smoother finish.
- Priming: Spray with a plastic primer for better paint adhesion.
- Painting: Use acrylic paints and a fine brush for detailed work.
- Sealing: Finish with a clear matte or gloss coat to protect your work.
Good finishing turns a plain print into a professional-looking collectable.
Common Problems and How to Fix Them
Layer Lines Visible
- Problem: Strong layer lines ruin the clean, blocky look.
- Solution: Use finer layer heights and post-process with sanding.
Support Marks
- Problem: Visible scars where supports were removed.
- Solution: Adjust support settings to minimise contact, or manually support in key areas only.
Warping
- Problem: Bottom corners lift off during printing.
- Solution: Use a heated bed and good bed adhesion techniques, such as a glue stick or blue tape.
Addressing these issues early ensures a cleaner final product.
Legal Notes on Minecraft Fan Prints
Minecraft’s EULA is relatively friendly to fan creations for personal use. However:
- Personal Use: Printing for yourself or as a gift is generally acceptable.
- Selling prints might violate Mojang’s policies without permission.
- Credit Artists: If you use a fan-made 3d model, always credit the creator.
Always respect intellectual property rights in the fan community.
READ MORE – EverQuest 3D Printing: Recreate Classic MMORPG Magic in the Real World
FAQs:
- Where can I find a 3D printable model of the Extra Cells 2 Walrus?
- Search fan sites like Thingiverse or commission a custom model if one isn’t available.
- What material should I use for printing the Walrus?
- PLA is ideal for easy printing and smooth finishes.
- How big should I print the Walrus figure?
- Anywhere from 5 to 15 cm tall works well for display pieces.
- Is it hard to paint a 3d-printed Walrus?
- No, Minecraft’s simple designs are easy to paint, even for beginners.
- Can I modify the Walrus design before I print it?
- Yes, using simple 3D editing software like Tinkercad, you can customise the size and shape easily.
Conclusion:
If you love Minecraft and especially the creativity brought by mods like Extra Cells 2, creating a 3D print of the Walrus is a fun and rewarding project. Whether you display it proudly on your desk or gift it to a fellow gamer, a printed Walrus captures the spirit of modding and making. Start your 3D printer, load up your favourite filament, and bring this charming Minecraft character to life in your own home!


